Hydro Dipping Activator for use with PVA Foils – 400ML Aerosol

14,49

Our one and only home formula HGWTP Activator, easy for everyone!

The yield of the 400ml Aerosol is approximately 8 m² PVA Foil.

Share this product:

Free shipping

When you order over £75 of hydrographics materials.

Support

DIY Water Transfer Printing, with help and instructions to guide you through every step of the Hydro Dipping process.

Quality PVA Films

100% European quality, no Ali- or China Express!

Information

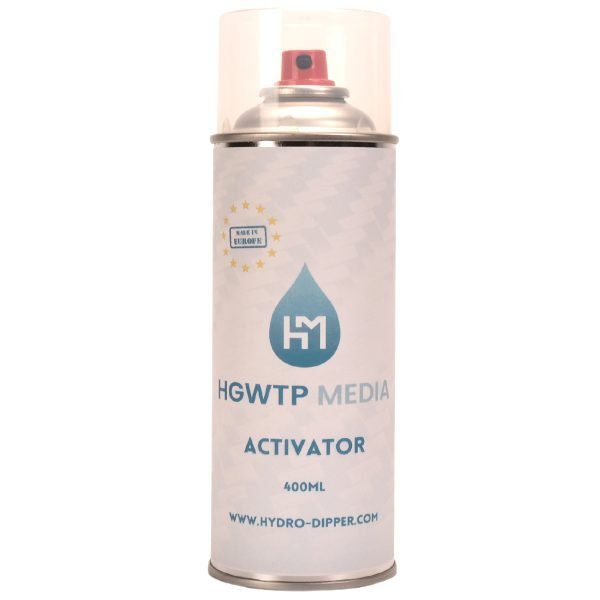
Developed and tested to perfection, the result of over 10 years of expertise in Water Transfer Printing.

The yield of our 400ml  HGWTP Activator Aerosol is approximately 8 m².

You always get the latest formula update, now version 6.1 from the end of 2021.

All our products are 100% European, no Ali- or China Express!

We are available every working day for help and instructions! (On whatsapp we try to respond 24/7)

Header-Banner-tiny-new

How does Hydro Dipping work?

To do it yourself at home you will need our materials from hydro-dipper.com:

It is recommended to prepare the object by applying a base color.

You can apply varnish after the process for finishing and protection, which will greatly increase lifespan.

A well protected print can last for decades!

Preparation

Ensure that the object you want to transform can be fully submerged under water for at least 30 seconds.
DO NOT Hydro Dip: electrical devices, live animals (…you never know) or any other organic matter.

Store the PVA-foil in a cool and dry place

The PVA foil can’t be kept in an open air environment for too long, store it in a dry and dark place, especially high humidity can cause damage to the PVA foil over time.

If you find the PVA is strongly rolling up on itself, you can always use some masking tape on the edges to weigh it down a bit.

What can you use as a Hydro Dipping Tank or water container?

Depending on the size of the object that will be Hydro Dipped, you can choose various options.

For smaller objects like phone cases, lunch boxes, or 3D prints, a bucket or laundry tub is more than big enough.

Really anything goes for larger items such as car- and scooter parts.

Often a plastic storage box is used, or for example an inflatable kiddie pool for very large items, you can use anything that can hold water, as long as it is big enough to completely submerge the object.

The dipping tank can get dirty sometimes, so try it in a bathtub at your own risk.

Cleaning the object prior to dipping

Make sure the object is cleaned properly and free of any greasiness on the surface, as an example you could use cleaning alcohol or just regular dishwashing soap.

After all the greasiness has been removed from the surface we recommend to sand the object with fine grain sanding paper, this will generate a proper adhesion in the following steps.

After sanding, clean the object properly again, making sure to get rid of any dust or other small particles.

Make sure the object is completely dry after moving on to the next step.

Applying the base color on the object

Identify the type of material of the object (plastic, metal, wood, etc.) and evenly apply the proper amount of primer paint to create the base color on the object, usually 1 or 2 layers is enough depending on the type of material.

The mix of paints supplied in our ABC Kits and PRO Kits has been specially developed for Hydro Dipping and is universal for all material types.

Keep in mind there are some types of plastic that cannot handle solvent based paints! Not sure? Test it first, on a small piece, in a non-visible area and check the results.

With the Carbon Fiber and Camouflage designs it is important to have the correct base color on the object as they are often partially transparent.

*If the object is already painted or varnished and has the desired base color, this preparation step can be skipped.

Placing the PVA foil on the water

Identify the side of the PVA foil that should come in contact with the water.

To determine which side should touch the water there’s an easy trick: moisten your thumb and index finger a little bit and then squeeze the corner of the PVA foil for about 5 seconds, and let go, the side that sticks to your finger, will be the side of the PVA foil that should be touching the water.

Unroll the PVA foil on a clean and dry surface, and cut it to the desired size, make sure to leave enough space in reference to the object to be dipped, at least 10cm (preferably 20 cm) all around.

You can put some masking tape on the edges of the PVA foil. This can help to avoid for the foil to curl up on the water, to help keep it in place in the center of the water surface, and to help keep it from spreading out to the edges after completely liquifying.

If you detect any air bubbles under the PVA foil, you have to move them to the side to release them, you can do this by gently blowing on the PVA foil or by carefully moving the bubbles to the edge with your fingers.

*You can put the masking tape on 2 opposite sides of the PVA foil (instead of all 4) this will give some more ´free movement space´ and can help the final result of the dip, especially for bigger and round objects.

What is the ideal water temperature for Hydro Dipping?

All variables between 25°C and 30°C are workable, we recommend 26°C to 27°C for an optimal handling and Dip time frame after applying the Hydro Dipping Activator.

How do you apply the Hydro Dipping Activator?

Shake the Aerosol spray can with Activator for about 5 seconds before each use.

Apply the activator evenly across the complete surface of the PVA foil, in a smooth left to right motion.

Keep the spray can at a slight angle and the height should allow the Activator to fall down on the PVA foil gently without moving the PVA foil to the edges of the Dip Tank.

Wait around 5 to 10 seconds, when the activator has been successfully applied the PVA foil will be completely liquified, and it will start to have a glossy mirror effect.

The amount of Activator that is applied is crucial for the Dip to be successful, we recommend to do some test dips with smaller object to get the feeling on how much Activator to apply.

*With a paint gun the process is similar to the spray can, we recommend a pressure of 0.7 to 0.8 bar and to use a fine mist, wide spraying nozzle.

How to perform the Hydro Dipping process

When you’re ready to Dip, keep the object to be transformed at an angle of about 30° while slowly dipping the object through the PVA foil.

Never enter the object into the water,  flat, always at keep it at an angle!

Try to determine with which side of the object is best to first enter the water so that it will create the least amount of disturbance to the water and and avoid the forming of bubbles while fully submerging the object.

When the object has a complicated shape, for example very large round corners, you can gently turn or move the object in a way that the print will follow a better ´path´while it is  being transferred to the object.

Also, if the object has holes, it is better to close the holes off with masking tape, this can help avoid abrupt splashes of water or the creation of bubbles which could mess up the Dip.

Keep in mind that the dipping process needs patience, and as with all other things in life, practise makes perfect! 

Washing off the PVA residue after dipping

After dipping the object it is very tempting to want to see the results as soon as possible, but we recommend to leave the object under water for a short while before taking it out, this way the PVA foil has some more time to absorb water.

When the object comes out of the water, you will notice a slimy substance all over the surface, this is the PVA foil that has now turned into gel.

This gel substance has to be completely removed under gentle streaming water.

Before showering the object wait for about 1 minute to give the print some time to complete the adhesion process.

To remove the gel hold the object under gentle streaming water of about 25°C, until it is completely gone, again very tempting to try and help the gel come off with your fingers, but it’s better to just wait without touching and let the water do it’s job without interference from impatient fingers.

The washing shouldn’t take more than a couple of minutes, you can carefully check if all the gel has come off by gently feeling the surface of the object with your fingers if you are uncertain of the result by just looking at it.

Applying varnish to protect the print

To increase durability we recommend to apply varnish. For optimal protection you can apply a second layer of varnish.

Troubleshooting:

After applying the activator there´s some parts of the PVA foil that have not liquified

Make sure to apply the activator evenly over the complete surface of the PVA film, in a steady left to right motion, gradually moving from the top to the bottom.

After applying the activator the print has deformed

Make sure to keep enough distance and spray the activator at a slight angle, the pressure of spraying should not move the PVA.

After Dipping there are small areas that did not get printed, small holes have appeared

This is probably caused by small bubbles that were present under the PVA, they can also be formed when submerging the piece to fast.

If there is any air bubbles present after placing the PVA on the water you can move them to the side by gently blowing on the film or by moving them to the sides with your fingers

While submerging the object take extra care no abrupt splashes are created, holes in the object can be closed with masking tape to avoid splashing.

The PVA foil is getting messed up with holes and curling up before applying the activator

Make sure the right side of the PVA film is touching the water.

You can check which side should touch the water by sqeezing a corner of the film for about 5 seconds with wet fingers the side that becomes sticky is the side that should face down touching the water.

I´m not happy with the results, can I Hydro Dip the object again?

Yes no problem! After rinsing off the PVA residue let the object dry properly, and then sand the object until it´s smooth and clean.

You can choose to apply another layer of base color paint to regenerate a smooth surface, then just follow the steps from the manual again.

It´s perfectly normal, a Dip can always go wrong, keep calm and give it another go!

And if you need any help or further instructions, don´t hesitate to contact us!

× Questions?
0